Speed Up Your Blogger Page Load Time – Compress Your CSS

Speed Up Your Blogger Page Load Time – Compress Your CSS

You have to admit, most free 3rd party Blogger templates that you download are a mess. You open up the xml file and it’s a long and ugly-looking beast of code spaghetti. If you’re like me, you prefer a nice and neat template (even though you’ll be the only one seeing it) and you’ll want to tidy it up.

Most of the code you don’t want to tinker with but the .css code (the part that styles your entire blog with images and colors) is where some people like to change font colors, sizes, or even just space it out properly so it’s important that it’s not only neatly organized, but also properly aligned.

More importantly, did you know the more lines of code your template has, the longer it takes to load in a browser? So your 1,500 lines of code in your newest Blogger template could really be much shorter in size, thus speeding up page load times for your visitors. The slower your site, the more likely a visitor will be deterred and not wait for it to load up.

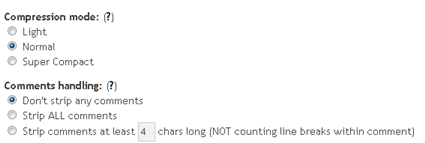
So here’s a neat trick to optimize your template. I’ve started doing it with some of the newer templates now being hosted on eBlog Templates. You’ll want to do what’s called “commpress your css” into a much smaller format. There’s a site I use called CSSDrive that offers a free web-based CSS Compressor. All you do is select a few basic options like compression mode and comments handling and then paste in your css. The css is the code between the and tags.

Make sure you backup your template code before doing this! Some people might not like how the css looks after it’s compressed so it’s best to have a backup. You also might make a mistake and copy the wrong sections which could screw up your template code. Bottom-line, backup your template before doing this.

css-compression-options.png

After you click on the “Compress-it!” button it will go through your .css code and shrinks it down. Essentially it removes unnecessary white spaces and better organizes each css element into one line. Here are the results for one of the Blogger templates I compressed.

css-compression.jpg

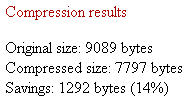
My xml Blogger template was originally 1,286 lines of code and after the css compression was done, it dropped it down to 914. Now that’s not a huge difference (14%) and you probably won’t notice a difference when you load up your blog with the new code, but every little bit helps. Also, some template code might be messier than others so the size decrease could potentially be a lot more.

I also just ran the normal compression mode and wanted to keep my comments so if you go with the super compact mode and strip out all comments, you can compress it even further.

This tool can be used for WordPress blogs or any other websites actually. Most of the Blogger templates I come across are the ones in need of a code clean up, however. So if you’re ready to give CSS Compression a shot, check out CSS Drive’s free tool and compress away!

How to Setup FeedBurner on Blogger

How to Setup FeedBurner on Blogger

Blogger is a great blogging platform which almost anybody can use. If you already have a Google account, it’s easy to setup (if not you just need one) and start blogging within minutes. The downside of using Blogger is the lack of built in features that are in my opinion essential to have. I’m going to share with you some of my favorite free Blogger add-ons that I highly recommend using. The first of the bunch being FeedBurner

Step #1 – Setup a FeedBurner Account

FeedBurner’s free rss service (now owned by Google) is very powerful. It allows you to place an rss image like the ones you see below on your blog so your readers can easily subscribe to your blog content. FeedBurner also offers a way for your readers to subscribe by email so everytime you post, an email will automatically get sent to them. Other features include seeing how many blog subscribers you have , which posts are most popular, as well as many other rss feed statistics. You’ve probably seen images like these on websites and especially blogs. This is what they are using. feed-icon32×32.png feedburner-img.gif Create your free account now.

Step #2 – Create Your Feed

The main piece of information you’ll need when setting up your FeedBurner account is your original blog feed url. All blogs automatically come installed with a feed but nothing is really done with it. That’s where the magic of FeedBurner comes in. Your feed url will look something like this:

http://yourblognamehere.blogspot.com/feeds/posts/default
http://yourblognamehere.blogger.com/feeds/posts/default

Feedburner offers auto discover so you don’t even need to figure out your feed url. Just enter your Blogger url right on their home page and it will automatically discover your feed. If you have more than one blog, it will list them all so select the blog you’d like to setup.

blogger-enter-url.gif

For bonus points and just for fun, paste the url into your internet explorer browser and watch what comes up. It’s basically the raw text and images from your blog posts. Pretty neat huh?

Follow the rest of the setup wizard and you’ll eventually come to the configuration page. Here’s where you want to select the extra features like “track item clickthroughs” and also check the “FeedBurner Pro” box. They used to charge $4.95 a month extra for this service but ever since Google acquired them, they offer these extra features for free. Why not take advantage of it?

blogger-config-stats.gif

Click the Next » button to finish the setup process and enter the feed management interface. Now you’re now ready to make your FeedBurner feed available on your Blogger site!

Step #3 – Point Your Blogger Feed to FeedBurner

Once you setup an account on FeedBurner, you’ll need to make sure all feed traffic for your blog content goes to your FeedBurner feed. This helps make sure your FeedBurner stats are more accurate and even any existing subscribers to your ‘Original Feed’ are routed through FeedBurner.

-The first step is to get the url of the new feed you just created. When you setup your Feedburner account, it asked you for a name of your first feed. For example, our feed on eBlog Templates looks like this:

http://feeds.feedburner.com/templatestreasure

Here’s the screen where you’ll find your new feed:
blogger feedburner example

Once you click on the “edit feed details”, you’ll see this screen. Notice what I highlighted in red? That’s the feed url you need to copy and save.

-Now you’re going to log into your Blogger account and head on over to the “Settings” => “Site Feed” tab.

blogger-new-sitefeed.gif

Scroll down until you find the “Post Feed Redirect URL” text box and enter the FeedBurner feed url you wrote down earlier. It will look something like this:

http://feeds.feedburner.com/templatestreasure

blogger-redir.gif

Make sure you type in your entire feed address including the “http://” portion otherwise you’ll have problems later. Click the “Save Settings” button and you should see the message “Settings were Saved Successfully”. Now Blogger will redirect all feed traffic for your blog to your FeedBurner feed which is exactly what we want!

Step #4 – Promote Your FeedBurner Feed on Your Blog

So now that everything is wired up properly we just need to promote it using one of those cool rss buttons on our blog. FeedBurner calls these icons chicklets (cute huh) so that’s what we’ll call it. Switch back over to your FeedBurner account and click on the “Publicize” tab.

blogger-click-publicize.gif

Then on the left side find and click on “chicklet chooser” and select one of the icons which will end up on your blog.

blogger-start-chk-chs.gif

Then scroll down to the bottom of the page and click on the drop-down. You’ll want to select “Blogger” to add the chicklet as a widget to your blog.

blogger-widget.gif

After you click the “Go!” button, Blogger will open in a new window and you’ll need to follow the prompts to continue to add the new widget.

blogger-add-page-element.gif

Once you click on “Add Widget”, it will take you to your Blogger page elements layout where you can arrange the new FeedBurner widget. Save your layout and you’re done! You should now have a cool-looking rss feed icon on your blog where anyone can easily subscribe to your blog. Remember to login to FeedBurner often to check out your stats. You can accurately see the number of subscribers and also get a good idea of what people are reading. It helps you decide the types of things to write about in the future!

For extra credit, see if you can add the Email Subscription widget to your blog. It’s a great option for people to use who don’t understand quite what rss feeds are. I’d also recommend spending some additional time browsing around FeedBurner’s interface because there’s lots of other cool options for you to configure. The best things in life are always free.

Social Bookmarking Widget for blogger

This Social bookmarking widget contains Post Link submission to major bookmarking sites like Digg , technorati , Blinklist , Del.icio.us , Mixx, Furl , Stumble Upon , Reddit , yahoo , Simpy and Spurl .
I hope those are the most famous social bookmarking sites with higher pagerank and traffic .

Just Follow this simple steps to add social bookmarking sites widget to blogger :

Step 1 :

Log in to your Blogger Account and navigate to Layout Section. Then go to Edit HTML Page and check the Expand Widgets box.

Step 2 :

Now search this code :<p><data:post.body/></p>


Step 3 :

Copy and paste the below code immediately below red text.
<!-- Start of social bookmarks updates By http://templatestreasure.blogspot.com/ -->
<span class='post-author' style='font-size: 95%;'><br/>
Submit Post to -:<a expr:href='&quot;http://digg.com/submit?phase=2&amp;url=&quot; + data:post.url + &quot;&amp;title=&quot; + data:post.title' target='_blank'>Digg</a> +
<a expr:href='&quot;http://technorati.com/faves?add=&quot; + data:post.url' target='_blank'>Technorati</a> +
<a expr:href='&quot;http://www.mixx.com/submit?phase=2&amp;url=&quot; + data:post.url + &quot;&amp;title=&quot; + data:post.title' target='_blank'>Mixx</a> +
<a expr:href='&quot;http://del.icio.us/post?url=&quot; + data:post.url + &quot;&amp;title=&quot; + data:post.title' target='_blank'>del.icio.us</a> +
<a expr:href='&quot;http://www.stumbleupon.com/submit?url=&quot; + data:post.url + &quot;&amp;title=&quot; + data:post.title' target='_blank'>Stumbleupon</a> +
<a expr:href='&quot;http://reddit.com/submit?url=&quot; + data:post.url + &quot;&amp;title=&quot; + data:post.title' target='_blank'>Reddit</a> +
<a expr:href='&quot;http://www.blinklist.com/index.php?Action=Blink/addblink.php&amp;Url=&quot; + data:post.url + &quot;&amp;Title=&quot; + data:post.title' target='_blank'>BlinkList</a> +
<a expr:href='&quot;http://www.furl.net/storeIt.jsp?t=&quot; + data:post.title + &quot;&amp;u=&quot; + data:post.url' target='_blank'>Furl</a> +
<a expr:href='&quot;http://www.spurl.net/spurl.php?url=&quot; + data:post.url + &quot;&amp;title=&quot; + data:post.title' target='_blank'>Spurl</a> +
<a expr:href='&quot;http://myweb2.search.yahoo.com/myresults/bookmarklet?t=&quot; + data:post.title + &quot;&amp;u=&quot; + data:post.url' target='_blank'>Yahoo</a> +
<a expr:href='&quot;http://www.simpy.com/simpy/LinkAdd.do?href=&quot; + data:post.url + &quot;&amp;title=&quot; + data:post.title' target='_blank'>Simpy</a>
<br/></span>
<!-- End of social bookmarks -->


How To Backup Your Blogs Widgets?

One of the Major Problem Blogger users have is whenever they try to change their templates , They will loss their widgets even if they take backup of their template. After Changing their template , they need to add widgets again manually. It’s really annoying and time consuming process.

Is there any way to Backup our Widgets ?

yes . We can backup our widgets before changing our template.

How to backup Blogger Widgets ?

It’s really simple guys , before changing template search your widgets code without putting check in expand widgets box.

Select the widget code as shown in the image below.


Now save the widget codes shown in between yellow box to notepad. Copy and Paste all your widget codes.

After doing this Upload your New Template . After uploading you will get a message like this


At This stage don’t click Confirm & save tab. Rather search for the following code , Now paste the widget codes you have saved immediately above or below the code in yellow

After adding the widget codes save your template.
That’s it ! Now you will have all widgets that you used in your previous blogger template.

How This works ?

Blogger will keep the widget content on their database with unique widget id.

I hope this hack will be very useful to you guys. Tell me your suggestions in our comment form , If you have any doubts ask there I will help you.

Disabling Right Click And CTRL + C Combination In Blogger

Content thieves are increasing day by day , they copy your content and change some words in it , use a few SEO tricks and make Google bots perceive the stolen content as original one , and their blog appear before yours on search results , yeah its that easy ,and this situation annoys every web master , but with a javascript code we can prevent thieves from copying our content.

Continue reading Disabling Right Click And CTRL + C Combination In Blogger


Top 10 Search Terms:

• disable ctrl c javascript • disable ctrl c • how to disable ctrl c in javascript • disable right click and ctrl c • javascript disable ctrl c • disable ctrl c in blogger • disable right click and ctrl c javascript