BLOGGING PROFIT FORMULA

make money online

Discover The SAME Formula That I Use To Rake-In $10K+ every month! Enter your details below and DOWNLOAD The Blogging Profit Formula For FREE! This Is The Same Formula I Use To Make Money Online on Autopilot...

Blogger Template : Pinky Girlz

1) How To Install :
First, at the dahboard, simply go to –>layout–>edit html
Then, upload the the ( I’m you know hot to do that ! )
Save changes and done ! Easy as that !

Notes :
1) You can change the header, if u want, simply search this url ” http://img165.imageshack.us/img165/4586/bannerboydn2.gif ” in the html and change it with your own image link. ( 985 x 170 )
2) It will be easier to install this template if you have at least 3 widget in this template, ( 2 html and 1 linklist )
3) The css it this template looks a bit ‘messy’ .I do it just to make you hard to hack it…eheh

Terms Of Use
1) You can remove the credit if you want to but please ask for my permission first.
2) You may not claim these template to be your own.
3) Thats all 🙂

Download!
Demo!

Spring is Ahead,Blue spring Blogger Template is here.It is a cool Black 2 Column blogger Template.This Blogger Template has got amazing cool features which will be discussed below.This awesome template is brought to you by Techknack.You can view the Live Demo of this template here or view the screenshot below:


  • FEATURES:
  • 2 Column Template
  • Cool Blue header
  • Black Blogger Template
  • Fixed Width
  • Multi header Link Bars
  • Cool Rollover Effects

NOTE:The Images might Not Be Loading So,Make sure to upload the images to your own host.

Download Now!

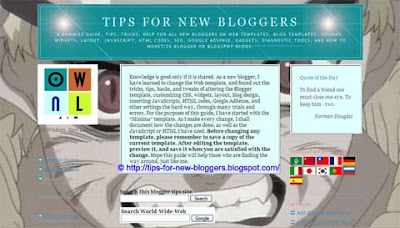
With this guide, you would be able to add a background image or picture to your Blog, customize the position of your image, and have a static background image that stays in place when you scroll through the contents of your blog.

You will need to create an image. Find a picture you like. If you need a free photo editing tool, you can either search the net for one or use Google’s Photo Editing Software Picasa. You can also use a small tile-size image which can be repeated so as to cover the entire page. Try not to have an image file that is too large as your page may take a little longer to load.


After creating a picture, you will need to upload it onto a free picture host. You can read about using free hosts like Google Page Creator and Google Groups. We have also a rather comprehensive list of free Image Hosts and File Hosting Services in our article on Manage Blogger Image Storage Space. Check out those sites and choose one that is fast, reliable and enables hotlinking to the uploaded files. Take note of the picture URL.

Next, log in to your dashboard layout; under Template -> Edit HTML, scroll to where you see this:-

body {
background:$bgcolor;

Change background color

If you would like to change the background color of your blog to a very unique color, you can manually specify the color value. Search online for color codes, or take a look at the HTML Color Chart to see if you can find your desired color. For example, if you have chosen a color code #B38481, change the above code to this:-

body {
background-color:#B38481;

If you are changing the background color of your sidebar only, add the color code under the relevant sidebar heading.

#sidebar-wrapper {
background-color:#B38481;

Similarly, if you want a different color for your main post column, add the color code as follows:-

#main-wrapper {
background-color:#B38481;

Note that different templates may label their stylesheets differently. The #sidebar-wrapper may be called #side-wrap or something to that effect.

Add a background image

The code to insert is this:-

body {
background-image: url(URL address of your image);

Remember to insert the URL address of your image in the brackets. If you would like to have a feel of how a background picture will look like, I have uploaded a test image at this address – http://i154.photobucket.com/albums/s255/ownlblog/narutosasuke1024x768.jpg

Insert the URL of this test image into the above brackets and Preview your blog.

You can also have a background image just for your sidebar. Locate the style and add the background image code accordingly.

#sidebar-wrapper {
background-image: url(URL address of your image);

For a background image to your main post body only, add the code here:-

#main-wrapper {
background-image: url(URL address of your image);

Repeat background image

By default, the image is repeated to fill up the entire background of the page. If you have a small or tile-sized image, it will appear like a print pattern in the background. Sometimes, you may choose not to have the image repeated. If that is the case, you can insert this code:-

background-repeat: no-repeat;

Alternatively, you may only want the image to be repeated horizontally. The code is this:-

background-repeat: repeat-x;

To have the image repeated vertically, the code is this:-

background-repeat: repeat-y;

Position background image

If you have an image that is not repeated, you may like to specify the exact position of this image on your page. The HTML code to be inserted is this:-

background-position: top left;

Your image will appear at the top left corner of your page. The other possible values that you can use to replace “top left” are:-

top center;
top right;
center left;
center center;
center right;
bottom left;
bottom center;
bottom right;

If you do not want it entirely left, right or center, you can also define the horizontal and vertical alignments either in percentage or in pixels. Use either of these values instead, with x being the horizontal value and y being the vertical value.

Static background image

After that, you may specify whether you want your background image to remain in a fixed position when the contents of your blog are scrolled. By default, the picture scrolls with your content. To have it stay put, the code to insert is this:-

background-attachment: fixed;

Putting it all together

The eventual CSS code that you will have for your customized template may look like this:-

body {
background-color:#B38481;
background-image: url(http://i154.photobucket.com/albums/s255/ownlblog/narutosasuke1024x768.jpg);
background-repeat: no-repeat;
background-position: center center;
background-attachment: fixed;

You can also combine the attributes into one line and the shorthand code will look like this:-

body {
background:#B38481 url(http://i154.photobucket.com/albums/s255/ownlblog/narutosasuke1024x768.jpg) no-repeat center center fixed;

Putting the above code into my blog, this is what you would see.

Background Image for Blogger Template

Of course, after having added the background image, you will need to adjust the colors of your text so that they stand out against the backdrop. Go to Template -> Fonts and Colors to do that.

Add Music to Blogspot blog

“Music, the greatest good that mortals know,
And all of heaven we have below.” … Joseph Addison

Depending on the subject matter of your blog, having music played in the background may either enhance the pleasure of reading or annoy your visitor. Imagine the agony of surfing the web in discreet, only to catch the attention of your office colleagues or parents when the music automatically blasts off in the background. Not to mention, a big music file may cause a slower page download. Nevertheless, the solution, as shall be explained later, is simple – have an option for the reader to play or stop the music.


To begin, you will need to have a music file uploaded onto a server. You can read about using free hosts like Google Page Creator and Google Groups. We have also a rather comprehensive list of free Image Hosts and File Hosting Services in our article on Manage Blogger Image Storage Space. Check out those sites and choose one that is fast, reliable and enables hotlinking to the uploaded files. Upon uploading, note down the URL of the file.

Alternatively, there are several sites that offer free download of their music files. You can enter search words like “free music download” or search for a popular artist name in the Google search box. Most of the sites that offer free download will lead you to the file location stored in their servers. Copy the URL of the music file that you have chosen.

If you would like to hear how the music works on your Blog, you can also use this music file which we have uploaded onto Google Pages – http://ownlblog.googlepages.com/BalladePourAdeline.mid – whenever you are prompted to enter the “URL of music file”. This file is for testing purposes only. Please do not link permanently to this file as it may be changed or deleted in due course.

Next, you would have to decide how you want the music to be played.

Link for reader to click

This is a text link. Your visitor can click the link if he wants to hear the music.

Remember to enter the URL of music file into the above code. This code can be inserted into your Blog post. If you want to put it in your sidebar, you can go to Template -> Page Elements -> Add a Page Element, select HTML/JavaScript and insert the code. Whatever words you type into the “Click to hear music file” will appear as the text link.

Music with a console

A music player console with controls of the volume, on and off buttons, would give your visitors a choice on how he wants the music played. With the code stated below, the music will not play unless the visitor clicks the play button.

You can either insert the music console into your Blog post or your sidebar. If you want it in the sidebar, go to Template -> Page Elements -> Add a Page Element, select HTML/JavaScript.

The code to insert is this:-

autostart=”false” height=”40″ loop=”true” playcount=”2″ src=”URL of music filewidth=”300″/>

For instance, using the following code:-

this is what you see:-

It will look different in IE and Firefox, depending on the installed plugins.

Note the following attributes and how they work on different browsers:-

1. Insert your URL of music file into the code.

2. The width of the example you see above is “300”. If you want it to be embedded neatly into your sidebar, the width should not be greater than the sidebar width. For example, if your sidebar width is 150px, the width of your console should be about 140px.

3. The height would depend on your preference and space constraints.

4. The autostart attribute has two options. If you choose “true”, the music will automatically play when your page is loaded. As I have mentioned earlier, this is not a good option unless you are absolutely sure all your visitors would not mind the music. The better option is to state it as “false”. If the visitor wishes to hear the music, he can click the play button to start the music.

Note, however, that while it works fine in Internet Explorer, it may not be so in Mozilla Firefox. The default setting for IE is “false” which means the music will not play automatically. The default setting for Firefox is “true”, and when we experimented with .wma and .wav files, they automatically played even when we set the autostart to “false”. If you are working on the Mac, the default setting for both browsers is “false”.

5. The loop attribute indicates whether the music should stop once that particular tune ends. The common attributes are “false” or “true”. If the attribute is “false”, the music ends after it is played once. If it is “true”, the music will automatically loop and continue playing until the visitor clicks the stop button or leaves your site. For short music pieces, you may want it to repeat and choose “true”.

For certain versions of Netscape browsers, another attribute that might work is loop=”n” where n is a number. If n is 2 for example, the music will play twice and stop. The similar attribute in Internet Explorer is playcount.

6. You can specify the number of times the music is to be played. In the above example, where playcount=”2″, the same piece of music is played twice before it stops. If you want the music to be played once, you can delete playcount altogether. Note that this only works in Internet Explorer.

Background music to play automatically

For the music to play the moment your page is loaded, the code will have to appear in the HTML document of your site. Note that in so doing, there are no controls for the visitor to choose whether or not to listen to the music, nor options to turn it off. Login to your Dashboard and under “Template”, click “Edit HTML”. Somewhere near the top, after the word , insert this code:-

URL of music file” width=”0″/>

Remember to insert the URL of music file into the code. There is no image of a console and readers cannot choose to turn off the music. Use this option with discretion.

Troubleshooting

The sound files can be in any format provided that your browser has the necessary plugin to play that file. Many people have problems playing MP3 files because their Firefox browsers do not have the necessary plugins. To check what your Firefox browser can support, enter this command into your browser:-

about:plugins

It will list all the installed plugins and the media files that can be played. If you need additional Mozilla Firefox add-ons, you can visit their Add-ons Page.

Drive New Traffic to Your Blog Using Spotplex

spotplex-logo.gif

Are you someone who always submits your blog posts to Digg hoping it gets enough “Diggs” to make their front page? Well, here’s a new site that takes all the work out of having to submit your post each time. Spotplex is a free service that dynamically provides an instant, impartial ranking of popular web content based on unique number of page views. That means the more people that read your blog posts, the more popular your content is and it will rank higher on Spotplex.

By inserting a single line of HTML code into your blog, you can instantly track the number of post reads. This will then be dynamically updated on the Spotplex site which is essentially like the Digg.com model, except you don’t need to vote or “Digg” a post. The voting is done dynamically by how popular your blog posts are.

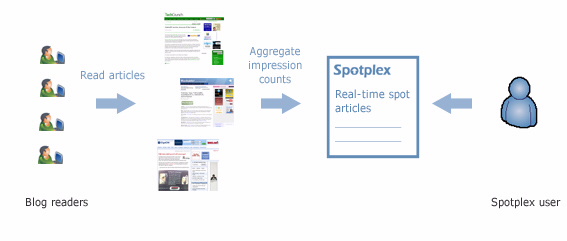
Their free service also provides you detailed analytics of your blog as well as potentially driving new traffic to your site. Spotplex also offers bloggers downloadable widgets to instantly analyze viewer traffic and to list other popular articles on your blog, increasing reader retention over time. Here’s an illustration as to exactly how the Spotplex model works.

spotplex-how-it-works.jpg

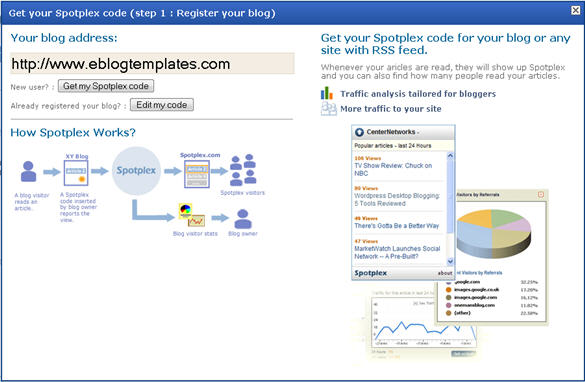
It’s fairly easy to install for both Blogger and WordPress and is only one line of javascript code. All you need to do is enter your blog url and Spotplex will automatically find your rss feed and provide you with a few options for installing it. The sidebar Spotplex widgets seem like a pretty cool addition as well but I didn’t bother using them.

spotplex-img.jpg

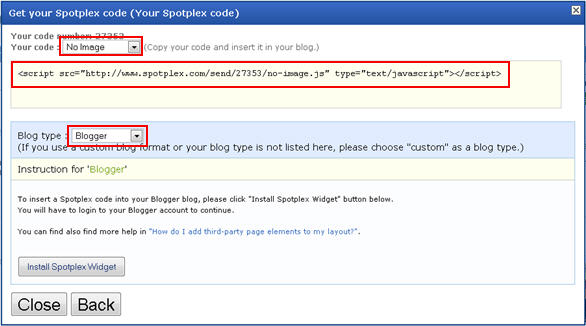
You’ll then be asked which type of blog platform you’re using (supports multiple types) and if you want a Spotplex image or not. You can also easily add it to your Blogger blog by clicking on the “Add Widget” button. This way you don’t need to muck with the template code. I prefer to not use a widget and just paste the javascript code (without the buton) right into my template somewhere in the HEAD section.

spotplex-img2.jpg

WordPress users can add it as a sidebar widget or also just copy the .js code and paste it into their header.php file.

If you are tired of “Digging” each one of your posts and your site gets a lot of traffic, this might be a great alternative for you. Spotplex is nowhere near as popular as Digg (at least not yet) but it doesn’t hurt using both services especially since Spotplex requires no manual post submissions. Give it a try and let me know what you think.

99100101102103104105106107108109110111112113114115116117118119FirstLast


whos.amung.us