Blogger Hacks

Everyday so many people while chatting on yahoo asks “How to install xml blogger templates?”.
So, to make it easier for you, here is the complete tutorial on how to install blogger templates…

1.First download the template and unzip the file using winrar or winzip. After extracting the file you will mostly see two folders named Images(incase if you lost) and an xml file.

2.Now, sign in to Blogger dashboard and click on the layout.

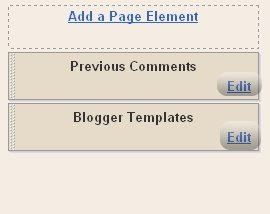
3.Here is the important step, after uploading any new Blogger template, all of the previous widgets like your google adsense ads,text,profile,poll,etc etc will be lost.
So, to avoid this to happen, in this step click on ‘edit’ on all the widgets and copy the codes into notepad,etc.

4.Next, click on the ‘Edit html’ tab

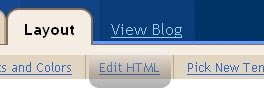
5.You’ll see an option to download the current template, so do it!

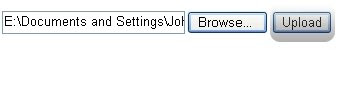
6.Just below that,there’s an option of uploading new template.So, use the Browse button and upload the downloaded xml file(which we discussed in step 1).

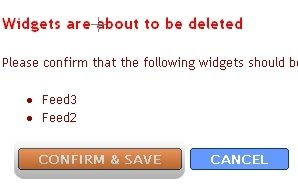
7.Now, a message appear saying that your widgets are about to be deleted.Click on the Confirm & Save (no problem doing this because we already copied the widget codes in Step 3).

Now you successfully installed the template 🙂
Click on the ‘Page elements’ page now and add the codes that you copied in step3 using the ‘Add a Page Element’ option.

Note:The *Images(incase if you lost)* folder contains all the image files used in the template.Due to lack of bandwidth since many users are using the same template in , you may see images not loading in your sites.So, For this not to happen, Upload all the images to your own server..
Doing this is very simple, Click on the ‘Edit html’ and go through the template code and replace all the image links(starts with http and ends with .jpg or .gif or .png) with the direct image links you got after uploading the images to any Free image hosting service like photobucket,etc.Or Just Read Our Article ‘Manage Blogger Image Storage Space. and SAVE THE CHANGES.

Hope That Must Have helped You..Don’t Forget to Comment.

Highlighting author comments using a different background color, border or different style of text helps readers understand when you have personally posted a response.

So far, “How to Highlight Author Comments” has been the most requested article in my Skribit widget, so in this post I’ll explain how you can change comments which you have posted yourself to distinguish these from other comments on your posts.

The main obstacle I’ve faced in writing up this article so far is that different Blogger templates code the comments section differently.

While the easiest method for me to write would have been to say “Find this code and replace it with this”, such a method would only be usable by bloggers whose template matches the code.

Instead, my explanation may be a little more complicated than usual, though I hope this explanation will ensure anyone using a Blogger template will understand how to implement the highlighted author comments hack!

Backup your Blogger Template!

Before even attempting to customize your Blogger template, the first thing you should do is back up your template. This ensures you can easily restore your original template if something goes wrong. Also, as most of us cannot see comments unless we are viewing a post page, it would be impossible to see if code changes have adversely affected the comments section.

To make a backup of your Blogger template, simply go to Layout>Edit HTML in your Blogger dashboard, and click on the “Download Full Template” link. This will save your existing template as an XML file which you could use to restore your blog, just in case 🙂

Finding the Comments Block in your Blogger Template

The first thing we need to do in order to implement this hack is to locate the “comments block” within your Blogger template.

To find the comments section, you will need to tick the “expand widget templates” box as this code is contained within your main “Blog Posts” widget.

As I’ve already pointed out, the section of code used to display comments varies in different templates, so in order to find this section, you may need to search for some specific tags rather than complete sections of code.

To give you an idea of what you are searching for, here is the complete comments-block code from the Minima template:

<dl id=’comments-block’>
<b:loop values=’data:post.comments’ var=’comment’>
<dt class=’comment-author’ expr:id=’data:comment.anchorName’>
<a expr:name=’data:comment.anchorName’/>
<b:if cond=’data:comment.authorUrl’>
<a expr:href=’data:comment.authorUrl’ rel=’nofollow’><data:comment.author/></a>
<b:else/>
<data:comment.author/>
</b:if>
<data:commentPostedByMsg/>
</dt>
<dd class=’comment-body’>
<b:if cond=’data:comment.isDeleted’>
<span class=’deleted-comment’><data:comment.body/></span>
<b:else/>
<p><data:comment.body/></p>
</b:if>
</dd>
<dd class=’comment-footer’>
<span class=’comment-timestamp’>
<a expr:href=’data:comment.url’ title=’comment permalink’>
<data:comment.timestamp/>
</a>
<b:include data=’comment’ name=’commentDeleteIcon’/>
</span>
</dd>
</b:loop>
</dl>

If you are using Minima (or a similar template) you should be able to locate this section of code easily. However, some templates use <ul> and <li> instead of <dl> and <dd> tags, in which case the code you are looking for may look more like the section on this page instead, or could even be wrapped in simple

tags.

If you are having trouble locating the comments section in your blog’s HTML code, do a CTRL+F (or CMD+F for Mac users) search within your template code for the following template tags:

* <b:loop values=’data:post.comments’ var=’comment’>
* <data:comment.author/>
* <data:comment.body/>

The comments section of your blog’s HTML code should contain all three of these template tags. Simply locate these tags and the surrounding code in your template, then work out where this section begins and ends using your discretion.

Generally speaking, this section will usually begin with

or

    or

    and end with a matching closing tag.

    Changing the comments code to add author highlighting

    Once you have located your comments section in your blog’s HTML code, you will need to highlight this entire section of code and replace it with the following section of code instead:

    <ul class=’commentlist’ style=’margin: 0; padding: 0;’>
    <b:loop values=’data:post.comments’ var=’comment’>
    <b:if cond=’data:comment.author == data:post.author’>

    <li class=’author-comments’ style=’margin: 0 0 10px 0;’>
    <b:if cond=’data:post.dateHeader’>
    <div class=’commentcount’/>
    </b:if>
    <cite>
    <b:if cond=’data:comment.authorUrl’>
    <a expr:href=’data:comment.authorUrl’><data:comment.author/></a>
    <b:else/>
    <data:comment.author/>
    </b:if>
    </cite>
    <br/>
    <div style=’clear: both;’/>
    <b:include data=’comment’ name=’commentDeleteIcon’/>
    <p><data:comment.body/></p>
    <div class=’commentlink-date’><a class=’commentlink’ expr:href='”#comment-” + data:comment.id’ title=’comment permalink’>
    <data:comment.timestamp/>
    </a></div>

    <div class=’clear’/>

    </li>

    <b:else/>

    <li class=’general-comments’ style=’margin: 0 0 10px 0;’>
    <b:if cond=’data:post.dateHeader’>
    <div class=’commentcount’/>
    </b:if>
    <cite>
    <b:if cond=’data:comment.authorUrl’>
    <a expr:href=’data:comment.authorUrl’><data:comment.author/></a>
    <b:else/>
    <data:comment.author/>
    </b:if>
    </cite>
    <br/>
    <div style=’clear: both;’/>
    <b:include data=’comment’ name=’commentDeleteIcon’/>
    <p><data:comment.body/></p>
    <div class=’commentlink-date’><a class=’commentlink’ expr:href='”#comment-” + data:comment.id’ title=’comment permalink’>

    <data:comment.timestamp/>
    </a></div>
    <div class=’clear’/>
    </li>

    </b:if>
    </b:loop>
    </ul>

    The simplest way to change your comment code is to follow these steps:

    1. Copy the code above to your clipboard
    2. Highlight the entire section of your comment code in your Blogger template
    3. Paste the code from your clipboard in place of the existing code by keying CTRL+V (or CMD+V).

    One quick method to check if you have made code errors is to preview your template. If you have accidentally omitted some code, you will receive an error message. In this case, you should press the “clear edits” button and begin again.

    If you don’t get an error message, you can then proceed to save your template.

    Adding style for author comments

    At this stage, your own comments will still appear in the same style as other comments. To highlight author comments, we need to add some style code to your blog template.

    This step is much easier than locating and changing the comment section. Simply locate the closing tag in your Blogger template, and immedietly before this, paste the following section of code:

    .author-comments {
    background: #cccccc;
    border: 1px solid #333333;
    padding: 5px;
    }

    If you prefer, you can change the hex colors (#cccccc and #333333) to match the color scheme of your own template (discover the color codes for your preferred schemes using the web color calculator).

    Then save your template.

    Now when you make a comment on your blog while signed in to your Blogger account, your comments will have a different border and background color to comments posted by your readers.


Star ratings is a new feature currently available through Blogger in Draft. This enables you to add a widget beneath your posts which readers can use to rate your articles on a scale of 1-5, like this:

If you use a default Blogger template, you should be able to activate this feature right away when logged through Blogger in Draft: simply go to Layout>Page Elements and edit the “Blog Posts” widget to activate the display.

However, those using a customized or third party template will need to add the required code to their templates first. In this tutorial, I’ll explain how you can add “star-rating” functionality to your customized Blogger template.

To use the “star ratings” feature, you will first need to activate this through Blogger in Draft (it’s still in beta, and not yet available for use in the regular Blogger dashboard).

Log into Blogger in Draft and choose the blog you wish to work with. Then go to Layout>Page Elements, and click the “Edit” link on the “Blog posts” widget.

This screen offers many options for you to add (or remove) from the posts section of your blog. If you scroll down a little, you’ll see the “star ratings” option. Tick this option to activate this setting for your blog, then scroll down to save your settings.

If you are using a default template, you should see the star ratings widget appear on the post pages of your blog. However, if you have customized your template (or are using a third party template), it is likely that your template does not include the code required to make the star ratings display.

Here is how you can add the required code for star ratings to your non-standard Blogger template

Step 1: Backup your existing template. I assume you know it very well so I am not gonna explain it again.

Step 2: Expand widget templates and copy the entire code some where in Notepad or something. In case something goes wrong, you have the entire widget code.

*Step 3: Go to ‘Layouts’ and under ‘Blog post’ widget, select Star rating. And save the changes.

*Step 4: Go to ‘Edit HTML’ and select ‘Expand widget templates’.

Step 5: Search for this line of code:

<p><data:post.body/></p>

Step 6: Copy the following code right after the above line of code:

Click here For The Code!

Step 7: Now again search for following code:

<b:include name=’feedLinks’/>

This line you may find several times, so make sure you seek for the last instance at the bottom of the code which should ideally be before the start of sidebar codes. So when you see this line, it should look something like:

<b:include name=’feedLinks’/>

  </div>

            </div>

        <div class=’cont-bottom’/>

        </div>

        </div>

        </div>

 </b:includable>

</b:widget>

</b:section>

….

….

<div id=’sidebars’>

Step 8: Copy the following code right after the line mentioned above:

<b:if cond=’data:top.showStars’>

    <script src=’http://www.google.com/jsapi’ type=’text/javascript’/>

    <script type=’text/javascript’>

      google.load(&quot;annotations&quot;, &quot;1&quot;);

      function initialize() {

        google.annotations.setApplicationId(<data:top.blogspotReviews/>);

        google.annotations.createAll();

        google.annotations.fetch();

      }

      google.setOnLoadCallback(initialize);

    </script>

  </b:if>

Step 9:Preview your changes without saving it. You should see the star rating in each post on your blog posts on the main page itself.

Step 10: That’s it, save your template if satisfied and enjoy the Star ratings on your blog.

Also let me know if this post helped you in customising your template by dropping a comment here or at least leaving your rating.

Speed Up Your Blogger Page Load Time – Compress Your CSS

You have to admit, most free 3rd party Blogger templates that you download are a mess. You open up the xml file and it’s a long and ugly-looking beast of code spaghetti. If you’re like me, you prefer a nice and neat template (even though you’ll be the only one seeing it) and you’ll want to tidy it up.

Most of the code you don’t want to tinker with but the .css code (the part that styles your entire blog with images and colors) is where some people like to change font colors, sizes, or even just space it out properly so it’s important that it’s not only neatly organized, but also properly aligned.

More importantly, did you know the more lines of code your template has, the longer it takes to load in a browser? So your 1,500 lines of code in your newest Blogger template could really be much shorter in size, thus speeding up page load times for your visitors. The slower your site, the more likely a visitor will be deterred and not wait for it to load up.

So here’s a neat trick to optimize your template. I’ve started doing it with some of the newer templates now being hosted on eBlog Templates. You’ll want to do what’s called “commpress your css” into a much smaller format. There’s a site I use called CSSDrive that offers a free web-based CSS Compressor. All you do is select a few basic options like compression mode and comments handling and then paste in your css. The css is the code between the and tags.

Make sure you backup your template code before doing this! Some people might not like how the css looks after it’s compressed so it’s best to have a backup. You also might make a mistake and copy the wrong sections which could screw up your template code. Bottom-line, backup your template before doing this.

css-compression-options.png

After you click on the “Compress-it!” button it will go through your .css code and shrinks it down. Essentially it removes unnecessary white spaces and better organizes each css element into one line. Here are the results for one of the Blogger templates I compressed.

css-compression.jpg

My xml Blogger template was originally 1,286 lines of code and after the css compression was done, it dropped it down to 914. Now that’s not a huge difference (14%) and you probably won’t notice a difference when you load up your blog with the new code, but every little bit helps. Also, some template code might be messier than others so the size decrease could potentially be a lot more.

I also just ran the normal compression mode and wanted to keep my comments so if you go with the super compact mode and strip out all comments, you can compress it even further.

This tool can be used for WordPress blogs or any other websites actually. Most of the Blogger templates I come across are the ones in need of a code clean up, however. So if you’re ready to give CSS Compression a shot, check out CSS Drive’s free tool and compress away!

How to Setup FeedBurner on Blogger

Blogger is a great blogging platform which almost anybody can use. If you already have a Google account, it’s easy to setup (if not you just need one) and start blogging within minutes. The downside of using Blogger is the lack of built in features that are in my opinion essential to have. I’m going to share with you some of my favorite free Blogger add-ons that I highly recommend using. The first of the bunch being FeedBurner

Step #1 – Setup a FeedBurner Account

FeedBurner’s free rss service (now owned by Google) is very powerful. It allows you to place an rss image like the ones you see below on your blog so your readers can easily subscribe to your blog content. FeedBurner also offers a way for your readers to subscribe by email so everytime you post, an email will automatically get sent to them. Other features include seeing how many blog subscribers you have , which posts are most popular, as well as many other rss feed statistics. You’ve probably seen images like these on websites and especially blogs. This is what they are using. feed-icon32×32.png feedburner-img.gif Create your free account now.

Step #2 – Create Your Feed

The main piece of information you’ll need when setting up your FeedBurner account is your original blog feed url. All blogs automatically come installed with a feed but nothing is really done with it. That’s where the magic of FeedBurner comes in. Your feed url will look something like this:

http://yourblognamehere.blogspot.com/feeds/posts/default
http://yourblognamehere.blogger.com/feeds/posts/default

Feedburner offers auto discover so you don’t even need to figure out your feed url. Just enter your Blogger url right on their home page and it will automatically discover your feed. If you have more than one blog, it will list them all so select the blog you’d like to setup.

blogger-enter-url.gif

For bonus points and just for fun, paste the url into your internet explorer browser and watch what comes up. It’s basically the raw text and images from your blog posts. Pretty neat huh?

Follow the rest of the setup wizard and you’ll eventually come to the configuration page. Here’s where you want to select the extra features like “track item clickthroughs” and also check the “FeedBurner Pro” box. They used to charge $4.95 a month extra for this service but ever since Google acquired them, they offer these extra features for free. Why not take advantage of it?

blogger-config-stats.gif

Click the Next » button to finish the setup process and enter the feed management interface. Now you’re now ready to make your FeedBurner feed available on your Blogger site!

Step #3 – Point Your Blogger Feed to FeedBurner

Once you setup an account on FeedBurner, you’ll need to make sure all feed traffic for your blog content goes to your FeedBurner feed. This helps make sure your FeedBurner stats are more accurate and even any existing subscribers to your ‘Original Feed’ are routed through FeedBurner.

-The first step is to get the url of the new feed you just created. When you setup your Feedburner account, it asked you for a name of your first feed. For example, our feed on eBlog Templates looks like this:

http://feeds.feedburner.com/templatestreasure

Here’s the screen where you’ll find your new feed:
blogger feedburner example

Once you click on the “edit feed details”, you’ll see this screen. Notice what I highlighted in red? That’s the feed url you need to copy and save.

-Now you’re going to log into your Blogger account and head on over to the “Settings” => “Site Feed” tab.

blogger-new-sitefeed.gif

Scroll down until you find the “Post Feed Redirect URL” text box and enter the FeedBurner feed url you wrote down earlier. It will look something like this:

http://feeds.feedburner.com/templatestreasure

blogger-redir.gif

Make sure you type in your entire feed address including the “http://” portion otherwise you’ll have problems later. Click the “Save Settings” button and you should see the message “Settings were Saved Successfully”. Now Blogger will redirect all feed traffic for your blog to your FeedBurner feed which is exactly what we want!

Step #4 – Promote Your FeedBurner Feed on Your Blog

So now that everything is wired up properly we just need to promote it using one of those cool rss buttons on our blog. FeedBurner calls these icons chicklets (cute huh) so that’s what we’ll call it. Switch back over to your FeedBurner account and click on the “Publicize” tab.

blogger-click-publicize.gif

Then on the left side find and click on “chicklet chooser” and select one of the icons which will end up on your blog.

blogger-start-chk-chs.gif

Then scroll down to the bottom of the page and click on the drop-down. You’ll want to select “Blogger” to add the chicklet as a widget to your blog.

blogger-widget.gif

After you click the “Go!” button, Blogger will open in a new window and you’ll need to follow the prompts to continue to add the new widget.

blogger-add-page-element.gif

Once you click on “Add Widget”, it will take you to your Blogger page elements layout where you can arrange the new FeedBurner widget. Save your layout and you’re done! You should now have a cool-looking rss feed icon on your blog where anyone can easily subscribe to your blog. Remember to login to FeedBurner often to check out your stats. You can accurately see the number of subscribers and also get a good idea of what people are reading. It helps you decide the types of things to write about in the future!

For extra credit, see if you can add the Email Subscription widget to your blog. It’s a great option for people to use who don’t understand quite what rss feeds are. I’d also recommend spending some additional time browsing around FeedBurner’s interface because there’s lots of other cool options for you to configure. The best things in life are always free.

1234567


whos.amung.us